
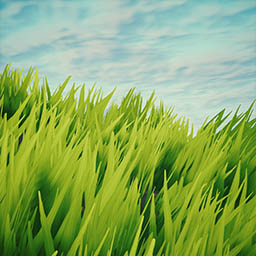
Stylized Grass Shader (Unity 6)
4.Placing grass
There are several methods to populate a world with grass in Unity, this section outlines them and their (dis)advantages.
This asset is a grass shader, hence does not contain any tools to achieve this. Such tools and systems should be considered entirely separate, since they’re often quite complex in their own right. The reality today is that Unity does not have the proper native tools needed for AAA vegetation rendering.
While the shader has been written to be as efficient as possible, the method used for rendering grass meshes will greatly determine how and where performance will be affected. In any event, I strongly recommend to learn and use the Profiler and Frame Debugger tools to get an insight into how rendering is performed in your project. This is the only correct way to gauge where rendering optimization is needed.
Unity terrain vegetation system
This is arguably the most accessible method, and does not require any third-party tools. The Unity manual has a section that covers this native functionality.
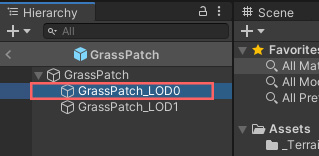
Because the terrain system does not support LODs, it’s required to create a grass prefab that just uses a single Mesh Renderer. To do so, open the grass prefab of your choice, and drag the “_LOD0” object into the Project window to create a new prefab.
Pros:
- Built in to Unity
- Used by tools like MapMagic, Gaia, MicroVerse and Vegetation Spawner
Cons:
- No support for LOD
- Not optimized for dense grass or large amounts (inherent to the internal tech)
- Compatibility with GI is questionable (grass instances aren’t actual renderer objects, so virtually don’t exist to other systems)
- Requires assigning a skybox reflection probe in the Environment Reflection settings, as scene probes have no effect.
Placing grass as GameObjects
By dragging a grass prefab into the scene you’ll have full control over it, just like any other object. It goes without saying that placing a piece grass one by one is not an option. For this reason you can use any prefab painting tool, such as PolyBrush.
Note that populating a scene with a large amount of individual GameObjects will increase CPU load, scene file size, camera culling overhead, and loading times. It’s not realistic to have an environment with 50k GameObjects and expect to hit all of your performance targets. So the amount of grass you can place is limited by how much performance legroom your project already has in these areas.
The shader uses supports GPU Instancing, the SRP Batcher and the GPU Resident Drawer, so draw calls in any case will fortunately be limited: one for depth, lighting and one per shadow cascade.
This method is definitely not recommended for large terrains, spanning open fields of dense grass.
Pros:
- Prefab painters usually apply random scale/rotations.
- Easy to manage to like any other GameObject
- Material changes are directly visible
- Meshes can be used with Occlusion Culling and Lightmapping
- LOD Crossfading (animated)
Cons:
- Has to be manually placed or painted
- Large scene file sizes (100’s of megabytes)
- Occupies a lot of memory (full GameObject data, most of which not even relevant for rendering)
- Requires CPU resources for culling and batching the individual Mesh Renderers (per camera)
Nature Renderer
Nature Renderer uses the terrain’s tree and details data, but renders everything using its own system. It allows you to use the terrain vegetation system as you would normally, but get all the modern rendering methods required for high amounts of vegetation (GPU instancing, cell-based and frustrum culling). As a result, this would work with other systems that spawn grass on terrain such as Gaia, Map Magic or Vegetation Spawner.
The grass shader is compatible with its “Procedural Instancing” technology. See the third party integrations page for more details.
Pros:
- No change in workflow (grass prefabs can be used with the terrain detail system)
- Supports LODs and crossfading
- Renders large amounts of grass at relatively fast speed
- Material changes are directly visible
- Aligns grass to terrain surface
Cons:
- Only renders on terrains
Vegetation Studio Beyond
Vegetation Studio is a system that utilizes GPU Instancing to draw identical meshes in only a few draw calls. It also performs frustum culling, to only render what’s visible in the camera field. It does not use any GameObjects, the grass is purely stored in memory and rendered through a custom render loop. Additionally, it provides a powerful rule-based system for spawning grass.
The grass shader is compatible with its Instanced Indirect rendering, which enables more than 1023 items to render in 1 draw call, next to GPU-accelerated culling.
Pros:
- Renders large amounts of grass at relatively fast speed
- Procedural rule-based placement of grass (in addition granular manual control)
- Fast control over density and scale/rotation/alignment
- Support for placement on meshes
- Integrated material controller when selecting a grass item
- LOD Crossfading (distance based)
Cons:
- Light probes and reflection probes aren’t supported
GPU Instancer Pro
As the name implies, GPU Instancer Pro (Unity 6) is a system is a rendering framework that makes use of Unity’s instanced rendering API. It supports both the conversion of GameObjects and terrain vegetation data.
The grass shader is compatible with its Instanced Indirect rendering, which can be enabled at the bottom of the grass material UI.
Pros:
- Renders extremely large amounts of grass with very few draw calls
- GPU-accelerated frustum, occlusion and distance culling
- Supports LOD groups and crossfading
- Can automatically convert Unity terrain vegetation
- Supports instancing of prefabs and meshes placed on terrains or regular meshes
- Compatible with tools such as Gaia and MapMagic when using terrain vegetation data
Cons:
-
Baked Global Illumination and Light Probes are not supported
Foliage Renderer 2
Foliage Renderer 2 is a GPU-driven vegetation rendering system designed specifically for dense foliage such as grass, plants, and trees. Instead of rendering vegetation as individual GameObjects, it stores instance data in GPU buffers and renders everything using indirect instancing. This allows very large amounts of foliage to be rendered efficiently with minimal CPU overhead.
The system includes its own painting and procedural spawning tools, allowing vegetation to be placed directly on terrains and meshes. It also performs GPU-accelerated frustum and distance culling to ensure that only visible vegetation is rendered.
The stylized grass shader is compatible with Foliage Renderer’s GPU Instanced Indirect workflow. When used together, large fields of grass can be rendered with only a few draw calls while maintaining full shader functionality.
Pros:
- Designed specifically for large-scale foliage rendering
- GPU Instanced Indirect rendering for extremely low draw call counts
- Built-in foliage painting and procedural spawning tools
- GPU-accelerated frustum and distance culling
- Supports placement on terrains and arbitrary meshes
- Supports LOD groups and crossfading
Cons:
- Requires learning and integrating a new vegetation workflow
Tips and tricks
- Individual grass objects should be rotated randomly on the Y axis between 0-180º. This greatly reduces visual repetition.
- Scaling the objects randomly between 80-120% is also advised for the same reason.
- Align the grass to the surface it is placed on. This will help with translating lighting, especially on hills.
- Disabling shadow casting for the grass will greatly reduce draw calls, consider going in that direction as a style choice. Contact/Raytraced Shadows are an excellent alternative, but currently aren’t available in URP.
- Unity’s SSAO will always look blurry on small objects such as grass, which is inherent to the technique. I recommend to use the Horizon Based Ambient Occlusion asset for far better results.