
📣 UNITY 6
Reminder: this asset is developed for use with Unity 2021.3-2023.2. For Unity 6, see Stylized Water 3
Stylized Water 2
7.Performance guidelines
The shader at its core is optimized through efficient use of resources and will typically outperform anything similar created using Shader Graph. The performance impact largely depends on:
- The features enabled
- The number of vertices the shader has to process.
- The amount of pixels on screen that the water shader renders for.
General notes:
- If the water doesn’t take up a lot of screen space, fewer pixels have to be calculated. Meaning it’ll render faster.
- If the scene is not using any dynamic lighting (such as a time of day system), you can disable lighting on the material to save performance (found under the Lighting tab). Reflections and translucency will still work in this case, if they’re enabled.
- Rendering the depth texture in URP essentially doubles the amount of draw calls for geometry. If your project isn’t already optimized for minimized draw calls, it likely has a negative impact. Consider disabling it in your URP asset and under the “Rendering” tab on the water material. Instead, use vertex colors to paint on effects.
- When having waves enabled, keep the “Count” parameter value as low as possible.
Relatively costly features:
- Normal map (per pixel matrix transformation + more data passed through shader stages)
- Waves (algorithm is run for both every vertex and water pixel on screen)
- Refraction (samples a full-screen texture + resamples depth to filter out objects above water)
Mobile hardware
Modern devices can run the shader in a simple scene with all features enabled and not notice a difference. If you’re targeting older devices, be sure to disable any features that do not contribute to the art direction.
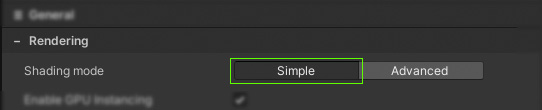
Always use the “Simple” shading mode, found under the “Rendering” tab in the material UI when targeting mobile hardware.
Set the “UV Coordinates” (General tab) to “Mesh UV” preferably, and manage the tiling of the water surface through UV’s (as with traditional materials). When using the “World XZ Projected” option the UV coordinates for textures can run up to relatively high numbers, and introduce floating point rounding errors (visible as pixelated and jittering textures). Low end hardware tends to be sensitive to this.
Planar Reflections
This involves re-rendering the scene geometry from a mirrored perspective, so can potentially double the rendering cost of a scene.
Culling Mask
It’s important to make use of the Culling Mask field, and only reflect layers that are important for the visual result. This would require you to create new layers, and set specific objects/prefabs to these layers.
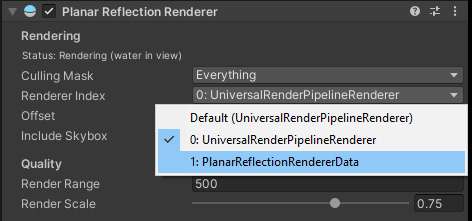
Renderer
A 2nd camera is used, that renders the scene from a mirrored perspective.
This camera (by default) also renders using the default “renderer asset”, which means any Render Features (eg. third-party post processing effects) will render for this camera as well. In most cases this is undesired for performance reasons.
Since the reflected image is applied directly into the water, effects may appear to be applied to the reflected image twice. This is wasteful…
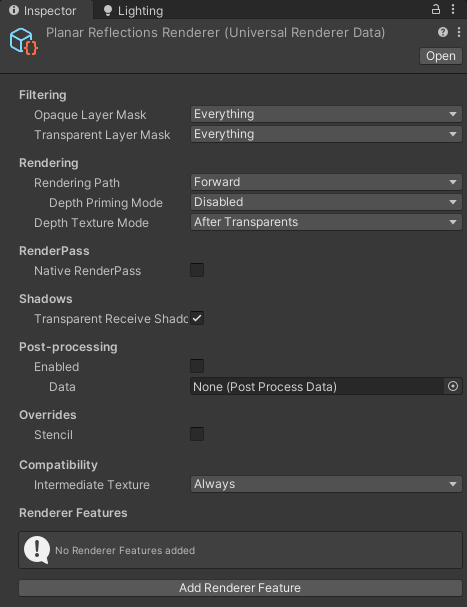
It is recommended to create a separate “empty” renderer, specifically for planar reflections.

To do so:
In the Project window, right-click and go to Create->Rendering->URP Universal Renderer (or Forward Renderer in <Unity 2021.2).

Which will create a new renderer asset:
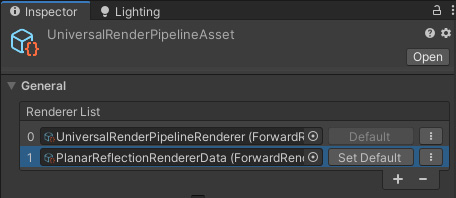
Next, in your pipeline asset(s), add the new renderer to the Renderer List (repeat this for any other pipeline assets used in your Quality Settings).
On the Planar Reflection Renderer component, configure it to use this renderer, instead of the default one.
With this set up, you can ensure no unnecessary or unwanted rendering is performed for the reflections.
Scripting
Because it’s common for a project to have varying quality scales, there’s a static function in place which can toggle planar reflections globally. This could be tied into something like an option, in a settings menu.
You can call the static function StylizedWater2.PlanarReflectionRenderer.SetQuality(bool allowReflections, float renderScale = -1f, float renderRange = -1f, int maxLodLevel = -1) to change settings for all active Planar Reflection Renderer instances. The last 3 parameters are optional, if left untouched these values aren’t changed.