📣 UNITY 6
Reminder: this asset is developed for use with Unity 2021.3-2023.2. For Unity 6, see Stylized Water 3
Stylized Water 2
4.2.Vertex colors
Vertex colors are mesh vertex attributes (a Vector4) just like position, normals and UV’s are. These can used to drive some of the shader’s behaviour. Vertex colors can be painted in any of the populair 3D tools, but also in the editor using PolyBrush.
Please refer to their manuals on how to achieve this.
Vertex colors can also be applied procedurally, by accessing a mesh’s vertices in C#, and assigning a vertex color to them. You can find an example script that does this here: https://pastebin.com/csT6AmYQ. It measures the distance from a vertex to the terrain bellow through raycasts, then stores the normalized distance in a vertex color channel.
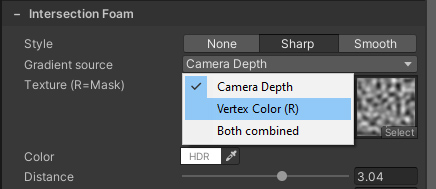
Red channel (intersection foam):
For this to take effect, the “Gradient source” under the Intersection tab should be set to either “Vertex color”, or “Both”.

For the best effect, make sure you’re not painting 100% red. The effect needs a linear gradient to work with.
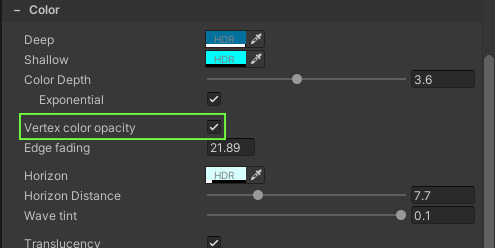
Green channel (Depth):
The “Vertex color opacity” checkbox must be ticked under the Color tab.

This controls the gradient used for the depth-based color effect. If the alpha channel of the shallow color is 0, the vertex colors makes the water transparent.
Note:
- You can also hide the water through a transparency mask, as outlined here.
- When River Mode is enabled, this vertex color channel controls transparency completely (meaning the normal map, refraction and light reflections also fade out)
Blue channel:
The “vertex color flattening” checkbox must be ticked under the Waves tab.

This makes it possible to have high waves in one part of the environment, while retaining flat water at the shoreline. Note that this does not affect Buoyancy , which will still read the original wave height.
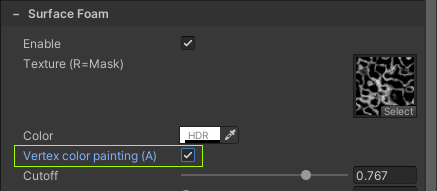
Alpha channel (surface foam)
Under the Surface Foam tab, the “Vertex color painting” checkbox must be enabled.

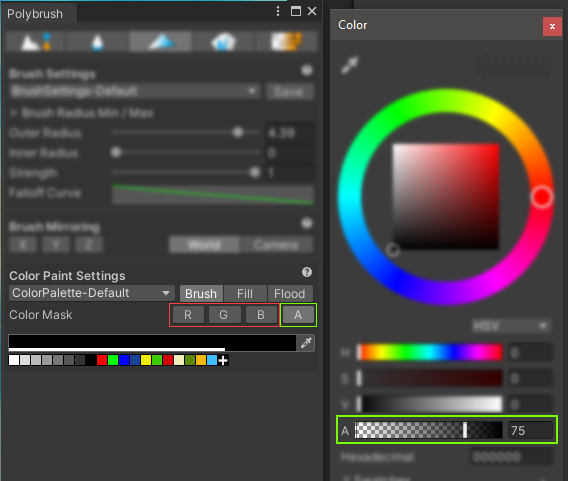
Painting the alpha channel works a little differently, in PolyBrush you have to set the color mask to only apply to the “A” (alpha) channel. After which, the alpha value of the color determines the strength of the value that’s being painted.
Note that the vertex color will add foam, the alpha channel of the color set on the material still controls the “base” foam opacity.

